How to use ERPXpand POS System
We are excited to announce the launch of a POS system designed to streamline the checkout experience, simplify inventory management, and improve order processing for businesses of all sizes. This syst
How to use ERPXpand POS System
We are excited to take you through the usage of the ERPXpand POS system designed to streamline the checkout experience, simplify inventory management, and improve order processing for businesses of all sizes. This system includes smarter item search and barcode scanning, a user-friendly checkout process with multiple payment options, and a faster receipt management system.
Benefits of the New Features
- Faster item lookup with search by item name, code, or barcode scan.
- A dynamic cart system that updates automatically when items are selected.
- Flexible checkout with multiple payment methods: cash, cheque, or credit card.
- A clear order summary panel displaying tax, quantity, net total, and grand total.
- Easy-to-use confirmation and receipt printing options.
- One-click New Order reset to quickly start fresh transactions.
Item Creation
Adding new items is easier and more intuitive:
1. Navigate to the Item List.

2. Click the Add Item button at the top right of the page.

3. A quick form dialog box opens for basic item details.

4. The full form can also be accessed for additional information and customization.

5. Once completed, the item is saved and ready for use.
This ensures that products can be added into the system quickly, keeping inventory always up to date.
Item Price Creation
To set pricing for items:
1. Navigate to the Item Price list.

2. Click the Add Item Price button.

3. A quick form popup appears for entering essential price details.

4. The full form can be accessed to complete advanced fields.

5. Save the form to finalize the price entry.
This makes it simple to manage product pricing and ensure consistency across sales transactions.
Item Search and Barcode Scanning
The POS now provides three convenient ways to add items to the cart:
1. Search by Item Name – Simply type the product name into the search box.

2. Barcode Scanning – Use a barcode scanner to instantly add items to the cart.

3. Search by Code – Input the product’s unique code for fast lookup.
Checkout Process
Once items are added, it appears in the Item Cart.
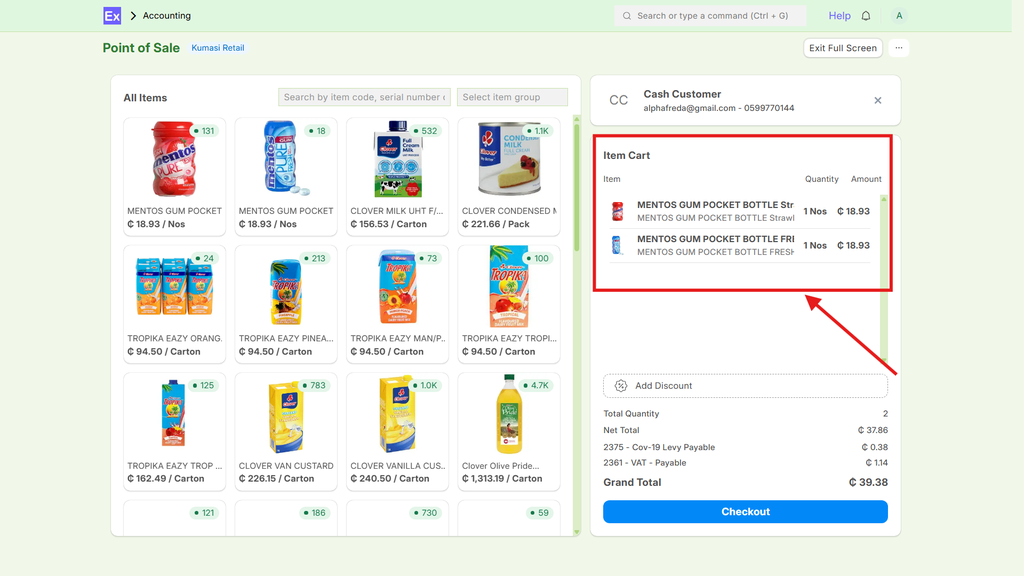
The Checkout button then becomes active. Clicking it opens the checkout page, where users can choose from multiple payment options—cash, cheque, or credit card.


A dedicated order summary panel is displayed on the left side, showing:
· Quantity of items
· Tax
· Net total
· Grand total

To remove an item, simply click on it in the cart. In the dialog box, a Remove button is available at the bottom right, allowing quick corrections without restarting the order.

Order Confirmation and Receipt
When the payment method is selected, clicking Complete Order triggers a confirmation popup to finalize the transaction. After submission, a digital receipt is displayed with the option to print, ensuring customers receive accurate proof of purchase.


Additionally, the New Order button allows staff to reset the system instantly and begin a new transaction without extra steps.

Conclusion
This POS system is designed to improve efficiency, accuracy, and customer satisfaction at checkout. By combining faster inventory search, flexible payments, and streamlined receipt management, This POS system empowers businesses to handle transactions more effectively than ever.
We are confident that it will enhance your point-of-sale experience and support your business operations with greater ease.
No comments yet. Login to start a new discussion Start a new discussion